Building a Strong Foundation: The Satellite Architecture
Proposing an Architecture for Integration Test Code

Is test code part of the application?
I would like to argue that it is. Luckily, even if you do not agree with me, this article will be useful.
The double standard
I wanted to write this article based on a double standard that I have perceived over the years upheld by many developers: test code is different from production code. Therefore, different rules apply to it.
The problem arises when (all) software design principles are abandoned because it is "just test code".
In this article, I will outline an architecture for integration test code. I will discuss which quality attributes matter most for this type of code and how to achieve them. Unit test code requires a different approach.
Why test architecture matters
There are many benefits to a well-maintainable codebase, one of which is that is easy to make changes to it. Why would this not uphold for test code as well? If your team aims for high test coverage, chances are you are spending more time working in test code than in production code.
Requirements
Writing tests is a chore for many developers. Sure, we do it because it ensures the quality of our code, but if there was a magic entity that would just point out problems in our production code we would quickly abandon the practice of writing tests.
Reality, however, still demands tests for our code. So, the best thing we can do is make this chore as easy as possible.
How do we achieve that?
By maximizing the following quality attributes:
Readability: Writing tests is dull, but trying to understand existing tests can be even more frustrating. A test is created only once, but read and modified many times over the life cycle of an application. Therefore, we should aim for maximizing readability over writability.
Modifiability: Whenever a change in production code behavior is required, the corresponding tests will also have to be changed. Tests should thus be easy to modify, just like you want production code to be easily modifiable.
Extensibility: Finally, new code requires new tests and these should be easy to add as well.
Fulfilling the Requirements
Let us break down those requirements into concrete rules of thumb that can be used while writing integration test code.
1. Readability
Our goal here is to minimize the time required for someone to understand the integration test code. Some ways of achieving this are:
Properly naming classes, methods, and variables.
Limit class size and method sizes
Use abstraction wisely. It can help understand code top-down but also introduces complexity.
Limit logic. Logic takes time to analyze when reading, so try to reduce (nested) if-statements
2. Modifiability
The SOLID principles are a good toolkit when trying to achieve modifiability in integration test code. The following tips highly overlap with them.
Just like when writing production code, think in terms of responsibilities. Components should have one clear responsibility without overlapping.
Use DI (dependency injection) in integration test code as well. This provides flexibility and limits the effect of changing dependency internals.
Extract constants and parameters of test scenarios consistently. Duplicate values take more time to update and incompletely extracted parameters can be tricky to debug once they are changed.
3. Extensibility
Extensibility can be achieved with the points made under modifiability as well, but there are some extra things to aim for.
Clean up state that was created by a test. For example, written records towards an in-memory database that lives for the whole test suite. State inherited from previous tests complicates assertions in following tests.
Extensibility is mostly solved by the testing framework we are using. It allows you to annotate a method as a test or test step and takes care of running it.
Satellite Architecture
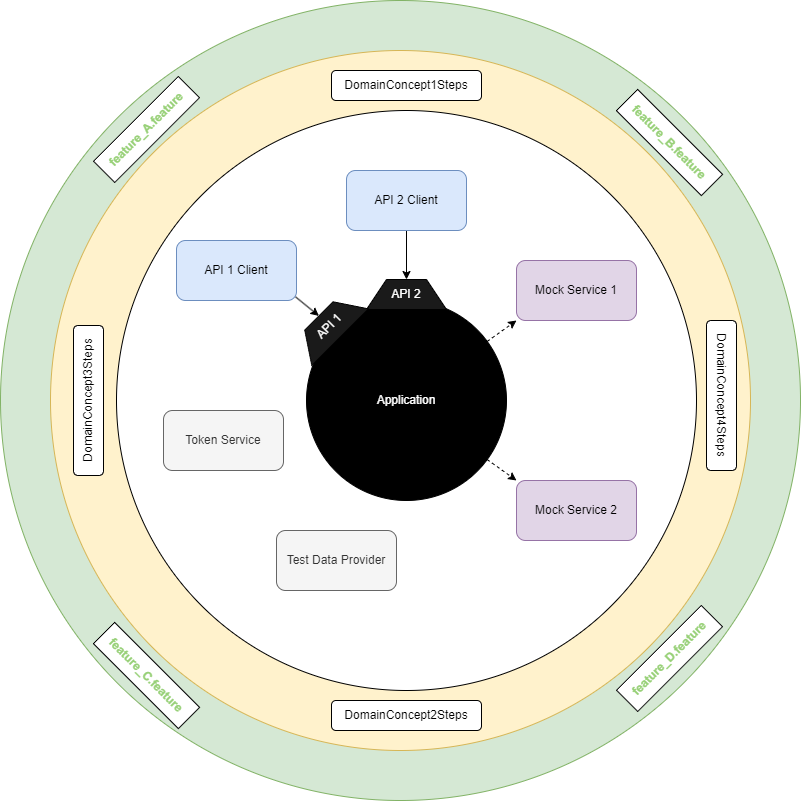
Figure 1: Overview of the layers of the satellite architecture.
The image above shows the satellite architecture. It consists of three layers: the scenario layer (green), the steps layer (yellow), and the satellite layer (white). Of course, there is also the application itself drawn as a black box in the middle. Let us go over the different layers and explain their responsibility.
Scenario Layer
This layer is responsible for describing the scenarios we want to test. I like to write these with a BDD framework like Cucumber, from which I borrowed the below example file.
Feature: Guess the word

  Scenario: Maker starts a game
    When the Maker starts a game
    Then the Maker waits for a Breaker to join

  Scenario: Breaker joins a game
    Given the Maker has started a game with the word "silky"
    When the Breaker joins the Maker's game
    Then the Breaker must guess a word with 5 characters
The scenario layer defines the steps, but not their technical implementation. Where possible this layer should be written in domain or business language. This decouples it from underlying technical implementations.
Steps Layer
The steps layer is comparable to the application layer and contains the implementation of the steps as seen in the scenario layer. Step implementations (steps) should behave like controllers and this layer should be very thin. Steps should instruct components from the satellite layer but should be indifferent to their implementation.
private ProfileResponse profileResponse;
private int createdUserId;

@given("a user named {string}")
void createUser(String fullName) {
    // executes a HTTP request to the API of the system under test
    createdUserId = userApiClient.createUser(fullName);
}

@when("I view their profile")
void viewProfileOfCreatedUser() {
    // executes a GET request and yields relevant properties of the response in a DTO
    profileResponse = profileApiClient.getProfile(createdUserId);
}

@then("I expect to see the personal information of {string}")
void verifyProfileInformation(String expectedFullName) {
    assertThat(profileResponse, notNullValue());
    assertThat(profileResponse.getStatusCode(), is(HttpStatus.OK));
    assertThat(profileResponse.getDisplayedFullName(), is(expectedFullName));
}
When should I make a new steps file?
As shown in Figure 1, feature files and step files are not in a one-to-one relation. Some features concern multiple domain concepts. Try to structure tests based on domain concepts. If steps share no relation or state, they do not have to be in the same step file.
Satellite Layer
This layer holds components that have direct interaction with the system under test, plus any utilities used by those components. The most important ones are:
API Clients - Components responsible for communicating with an API of the SUT (system under test). If the SUT implements multiple independent contracts, make multiple API clients as well. No need to intertwine these.
Mock Services - Components that mock external systems that our SUT communicates with.
Test Data Providers - Provide test data like responses of mock services, example messages on a message queue, and other stub data.
Authentication Helpers - Your SUT will typically perform authentication and authorization on incoming requests. The satellite layer contains authentication helpers that will provide the right tokens to send along requests made by API Clients.
Example Scenario
Now that we have discussed the different layers, let's apply this architecture to an example scenario of a banking application.
@HappyFlow
Scenario: Viewing someones elses bank account is not allowed
  given that I am logged in as "Alice"
  given another user "Bob"
  when I try to view the account of "Bob"
  then I should not be allowed to do so
Preparation
Before we start implementing the steps, we need to prepare any mock services that will be required during the scenario. I prefer to leverage hooks of the testing framework for this over dedicating steps to technical setup. Therefore, I use the @HappyFlow annotation to state that all mock services behave as expected. The setup (and teardown) then become the following.
public class AccountSteps {
    @Autowired // Spring mechanism for DI
    MockRegistrationService mockRegistrationService;

    @Before("@HappyFlow")
    public void setUp() {
        mockRegistrationService.start();
        // start other mocks...
    }

    @After("@HappyFlow")
    public void tearDown() {
        mockRegistrationService.stop();
        // stop other mocks...
    }
}
The (simplified) contents of a mock service would look like this:
@TestComponent
public class MockRegistrationService {
    // this repo will provide stub responses
    StubDataRepository stubDataRepository;

    WireMockServer wireMockServer;

    public MockRegistrationService(StubDataRepository stubDataRepository) {
        this.stubDataRepository = stubDataRepository;
        wireMockServer = new WireMockServer("localhost", 9000);
    }

    public void start() {
        wireMockServer.start();
        mockGetRegistrationEndpoint();
        mockPostRegistrationEndpoint();
    }

    // mockGetRegistrationEndpoint, mockPostRegistrationEndpoint, ...

    public void stop() {
        wireMockServer.stop();
    }
}
Implementing the Steps
The first step requires us to assume the identity of Alice. Assuming we are talking to a REST API we will not be using this identity until a later step, so I would generate a token and place it in the shared state for later use.
public class AccountSteps {
    @Autowired
    TokenService tokenService;

    String tokenOfLoggedInUser;

    @given("that I am logged in as {string}")
    public void logInAs(String user) {
        tokenOfLoggedInUser = tokenService.getTokenFor(user);
    }
}
The second step requires preparing a user Bob, with an account that we will later try to view as Alice. This requires asking the SUT to create an account for Bob and storing which account was created, to be able to request it later as Alice.
public class AccountSteps {
    @Autowired
    AccountAPIClient accountAPIClient;

    Map<String, UUID> createdAccounts = new HashMap<>();
    // other fields ...

    @given("another user {string}")
    public void createAccount(String user) {
        createdAccountId = accountAPIClient.createAccountFor(user);
        createdAccounts.put(user, createdAccountId);
    }

    // other steps ...
}
Next, we will try to view Bob's account as Alice. We use the prepared shared state for this, together the accountAPIClient , since viewing an account concerns the same API as creating one.
public class AccountSteps {
    @Autowired
    TokenService tokenService;
    @Autowired
    AccountAPIClient accountAPIClient;

    String tokenOfLoggedInUser;
    Map<String, UUID> createdAccounts = new HashMap<>();
    ViewAccountResponse viewAccountResponse; // new

    @when("I try to view the account of {string}")
    public void viewAccount(String userToView) {
        viewAccountResponse = accountAPIClient.viewAccount(
            createdAccounts.get(userToView),
            tokenOfLoggedInUser
        );
    }
    // other steps ...
}
This is the most tricky step to keep clean. Its only responsibility is viewing the account. Therefore:
the APIClient should not throw an exception that this step has to catch. It simply gives a response back (that contains a status code).
This step does not perform any asserts. It only executes the request via the client and stores the result for another step to interpret. This allows this step to be reused. A sunny day flow can use this same step but followed by a different assertion on the response.
Finally, we have the verification step, which becomes rather simple:
public class AccountSteps {
    // ... other fields
    ViewAccountResponse viewAccountResponse;

    @then("I should not be allowed to do so")
    public void checkThatViewAccountResponseStatusIs403() {
        assertThat(viewAccountResponse.getStatusCode(), is(403));
    }
}
Conclusion
Whether or not test code is part of your application, nobody likes working in messy code. That's why I presented guidelines for clean integration test code in this article in the form of an architecture: the satellite architecture.
It separates integration test code into three layers:
Scenario Layer - Describes test scenarios in a normal language, independent of their technical implementation.
Steps Layer - Lean implementation of scenario steps. Contains state that is shared between steps and delegates work to components in the satellite layer.
Satellite Layer - Layer containing mostly independent satellites, each of which has a clear single responsibility. Examples are API clients, mock services, and authentication helpers.
Why would you adopt this architecture?
It makes your integration test code maintainable. By clearly separating concerns into different layers and components, modifiability, extensibility, readability, and reusability are all increased.
Give this way of structuring your integration test code a try and let me know what you think!


